Setting Up WLED On ESP8266
In this tutorial, we are going through step by step procedure to set up one of the most popular DIY LEDs firmware. WLED opens up enormous opportunities to use your creativity with the LED strips for the decoration of your room, Holiday light shows, Christmas light automation and many more. WLED lighting can be integrated with Home Assistant effortlessly for automation purposes.
Why WLED?
WLED is an open-source software which is written by Aircookie to be used on NodeMCU ESP8266 and ESP32 to control NeoPixel such as WS2812B, WS2811, and SK6812 LEDs, as well as SPI, LED drivers such as WS2801 and APA102. WLED is packed with over 100 special effects and 50 palettes to choose from. Check out all features from the WLED GitHub page. After the installation of WLED on the ESP controller, it runs a web server that serves as a gateway to be controlled by smartphone and tablet, MQTT, and Blynk.
What is ESP8266?
According to Wikipedia, the ESP8266 is a low-cost Wi-Fi microchip, with a full TCP/IP stack and microcontroller capability. In simple words, it can be programmed like any other microcontroller such as Arduino with the special ability to connect to the WiFi network and interact with the Internet and let your smartphone connect to and controller it. This ability make it an ideal controller for IoT application and DIY Smart Home application.
ESP8266 Vs ESP32 - Which One To Choose?
ESP32 is the upgraded version of ESP8266 which has built-in Bluetooth, higher Clock Frequency and etc. In this tutorial, we are going to focus on ESP8266 module because it is more affordable and it meets our requirement for most of the project with WLED.
Hardware Parts Requirement
WLED Installation on ESP8266
If you are using a different controller, then you need to select the right .bin file for it. For instance, if you decide to choose ESP32 as your controller, download 'WLED_<version-number>_ESP32.bin' from Assets section. If you are interested to know more about other files on this page, read more about
what binary should I use section.
I am going to use
ESPhome-Flasher because it is easy. Download the latest release of ESPhome- Flasher on your computer. This software does not require installation as it works as portable software. click and open the software after downloading.
Connect your ESP8266 module to your computer via a micro USB cable. Generally, your PC should recognise the hardware driver. However, if your computer was not able to recognise the hardware module, download the right driver as needed '
CH340' or '
CP2012'.
As you can see, my computer recognises the driver on the COM5 port. If your computer does not recognise the driver, it displays an unknown device.
 |
| Windows Device MAnager |
Run the ESPhome flasher and If everything goes as the plan, you should be able to see the connection port from the serial port dropdown menu. Please note that on your computer you might have a different COM port number, COMX. Select the right COM port and move on to the Firmware section.
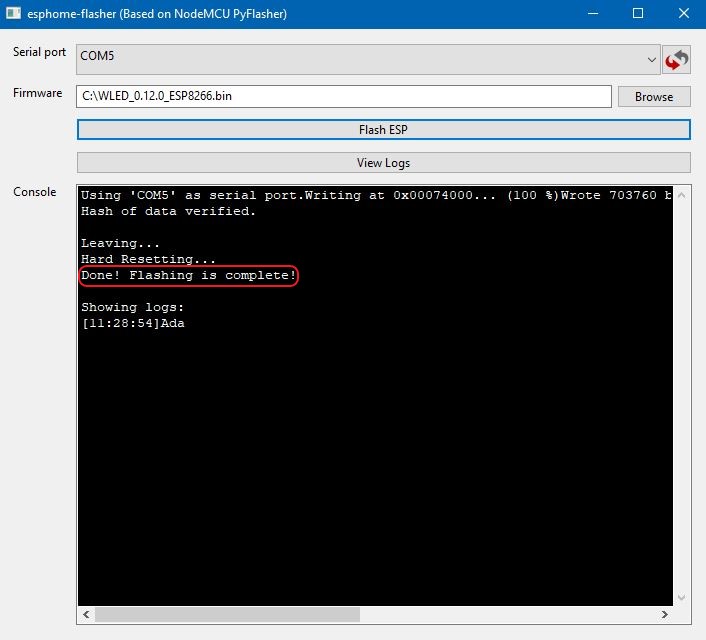
In this part, you need to browse the firmware file WLED_<version-number>_ESP8266.bin that you have downloaded in the previous section. Select the .bin file and click the 'Flash ESP' button.
When it is finished you must see the below message in the Console section. It takes about 30 seconds. be patient!
ESP8266 Wiring to LED Strips
In this section, we are not going to use an external power supply to power LEDs instead we are going to power up the ESP8266 through a micro USB port and use the controller output voltage to provide power to the LED strip.
 |
| ESP8266 Pinout |
Pin 'VIN' and 'G' is going to be used to provide power to the LED strip and D4 is a data line that sends an instruction to LEDs IC on the strip. The power requirement for LEDs strip depends on many factors. My general rule of thumbs is that 5 volts power supply with a 2 Amps current rating is enough for up to 90 LEDs. There is plenty of online Watts to Amps Calculator that you can use.
 |
| Power Supply - ESP8266 Pinout |
 |
| Data - ESP8266 Pinout |
WLED Configuration
Let's start configuring the WLED through the access point which is built-in into the ESP8266 through the firmware. Connect ESP8266 module to USB charge through micro USB and use your smartphone or tablet Wi-Fi network to search for nearby networks. Click on WLED-AP network and use wled1234 for the password.
You should see below greeting prompt page right after that. In this step, you will be given the option to set up your Wi-Fi network setting or start controlling the LEDs through your device. I strongly recommend to set up Wi-Fi setting first because you do not need to connect to the access point every time you need to control or make any change to the LEDs setting. Also, you can control LEDs through the WLED App.
If you select Wi-Fi settings, you will be prompted with the Wi-Fi setup page. Enter your Network name and password, then select 'Save & Reboot'. It would take a few seconds for your ESP8266 controller to boot up and connect to your Wi-Fi network automatically. As you can see from below, my Network and password name. Make sure you get the network name spelling right.
WLED APP
You can download the WLED Application for your Android and IOS device. After downloading the App, ensure your phone is connected to the same network as ESP8266.
Then open the app and select + sign button in the top right corner to add your LEDs to the WLED APP.
Select 'Discover lights...' and it will search for all WLED device that is running on the same network as your device connected to. Once the right light has been found, select the checkmark sign in the top right corner. Then you are done. Congratulation!
Click on WLED to get to the WLED controller page.
Feel free to play around and learn more about how to make an awesome LED display.


Comments
Post a Comment